Beginner’s Guide To Setup Kubernetes
Steps to install Kubernetes Cluster
Requirements
The major requirements are stated below regarding the setup process.
Master:
2 GB RAM
2 Cores of CPU

Slave/ Node:
1 GB RAM
1 Core of CPU
1.Install Kubernetes
The below steps mentioned to be executed on both the master and node machines. Let’s call the master as ‘kmaster‘ and node as ‘knode‘.
1.1 Change to root:
Here, the changing root has been applied because the sudo provides permission to set up Kubernetes and to avoid the permission process we have changed the root.
$ sudo su
# apt-get updateThis command used to update a system.
1.2 Turn Off Swap Space:
Kubernetes doesn't support "swap". So we have to apply the below command to turn off the swap space.
# swapoff -a1.3 Fstab action
After that, you need to open the ‘fstab’ file and comment out the line which has a mention of a swap partition.
# nano /etc/fstab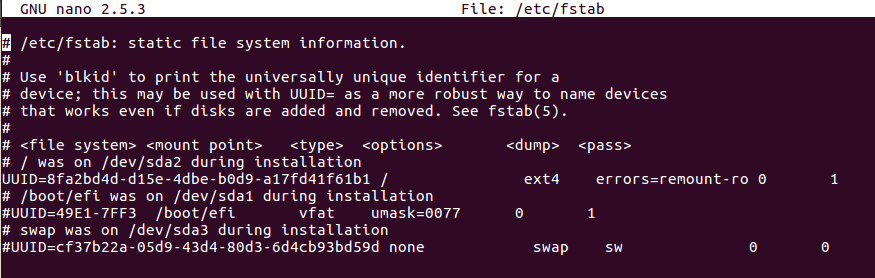
Press ‘Ctrl+X’, after that press ‘Y’ and then press ‘Enter’ to save the file.
1.4 Update The Hostnames
To change the hostname of both machines, run the below command to open the file and subsequently rename the master machine to ‘kmaster’ and your node machine to ‘knode’.
# nano /etc/hostname
Press ‘Ctrl+X’, after that press ‘Y’ and then press ‘Enter’ to save the file.
1.5 Update The Hosts File With IPs Of Master & Node
Run the following command on both machines to note the IP addresses of each.
# ifconfig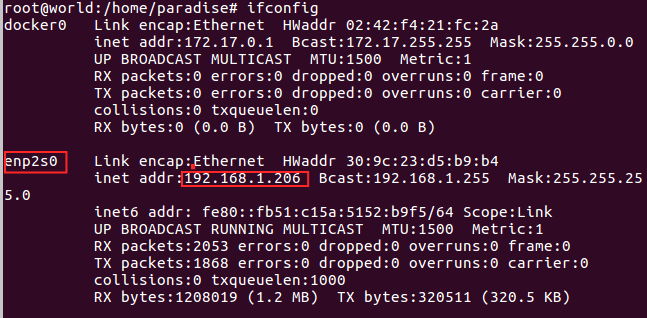
Now go to the ‘hosts’ file by moving over both master and node and add an Entry by just specifying their respective IP addresses along with their names i.e. ‘kmaster’ and ‘knode’.
# nano /etc/hosts
Press ‘Ctrl+X’, after that press ‘Y’ and then press ‘Enter’ to save the file.
1.6 Setting Static IP Addresses
We will make the IP addresses used as above, static for the VMs. We can do, by just modifying/changing the network interfaces file. Then, run the following command to open the file:
# nano /etc/network/interfacesNow enter the following lines in the file.
auto enp0s8
iface enp0s8 inet static
address
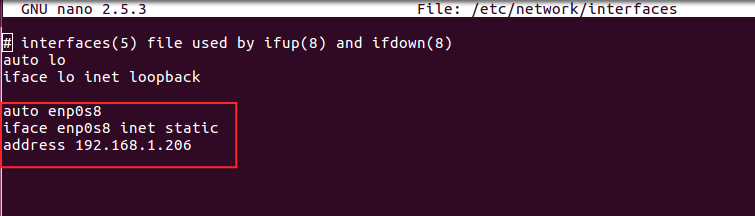
Press ‘Ctrl+X’, after that press ‘Y’ and then press ‘Enter’ to save the file.
After this, restart your machine.
1.7 Install Open SSH-Server
Now we have to install the openshh-server. Run the following command:
# sudo apt-get install openssh-server2. Install Docker
Now we need to install Docker as docker images will be utilized for managing the containers in the cluster. Run with the following commands:
# sudo su
# apt-get update
# apt-get install -y docker.io
We’ve just explained how to docker in your own system instead of the process of how to add a $user in a docker or how to install docker-compose, for the basics of Kubernetes you can follow by just tapping over this link:
3. Install kubeadm, Kubelet And Kubectl
To move further, we’ve to Install these 3 essential components for just setting up the environment of Kubernetes: kubeadm, kubectl, and kubelet.
Run the following commands before installing the Kubernetes environment.
# apt-get update && apt-get install -y apt-transport-https curl
# curl -s https://packages.cloud.google.com/apt/doc/apt-key.gpg | apt-key add -
# cat <<EOF >/etc/apt/sources.list.d/kubernetes.list
deb http://apt.kubernetes.io/ kubernetes-xenial main
EOF
# apt-get update
Kubelet is the lowest level component in Kubernetes. It’s reliable for what’s running on an individual or specific machine.
Kubeadm is used for administrating the Kubernetes cluster.
Kubectl is used for controlling the configurations on various nodes inside the cluster.
# apt-get install -y kubelet kubeadm kubectl3.1 Updating Kubernetes Configuration
Next, we will change the configuration file of Kubernetes. Run the following command:
#nano /etc/systemd/system/kubelet.service.d/10-kubeadm.confThis will open a text editor, enter the following line after the last “Environment Variable”:
Environment="cgroup-driver=systemd/cgroup-driver=cgroupfs"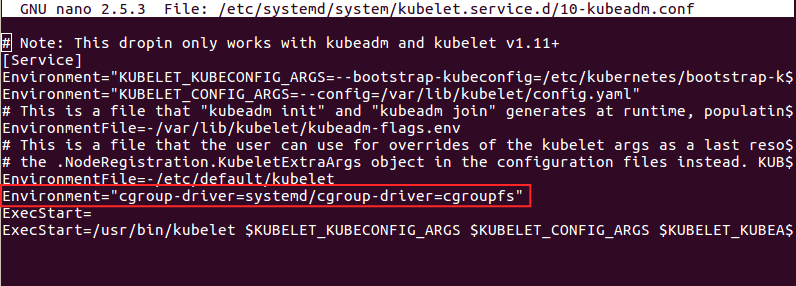
Press ‘Ctrl+X’, after that press ‘Y’ and then press ‘Enter’ to save the file.
4. Steps Only For Kubernetes Master VM (kmaster)
All the required packages were installed on both servers till now. But, the further steps will work upon the Master Node only. Now, run the following command to initialize the Kubernetes Master.
4.1 Initialize Kubernetes Master with ‘kubeadm init’
Run the beneath command to initialize and setup Kubernetes master.
# kubeadm init
(or)
# kubeadm init --apiserver-advertise-address=<ip-address-of-kmaster-vm> --pod-network-cidr=192.168.0.0/16
# kubeadm init --apiserver-advertise-address 192.168.1.206 --pod-network-cidr=172.16.0.0/16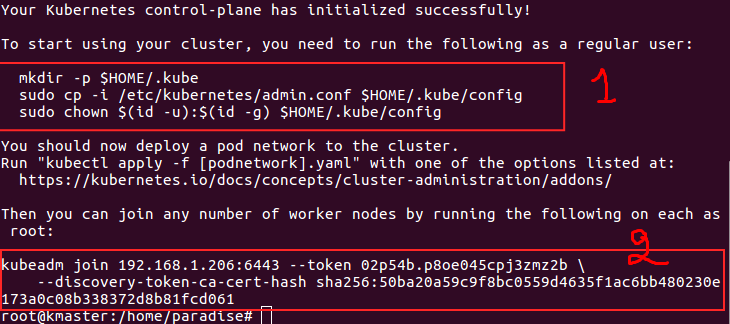
In the selected part 1, when we initialize Kubeadm with the command then it will show you the kubernetes control-panel has initialized successfully. The three commands as shown in the images’ part 1 should be run to create .kube folder.
As mentioned before, run the commands from the above output as a non-root user
$ mkdir -p $HOME/.kube
$ sudo cp -i /etc/kubernetes/admin.conf $HOME/.kube/config
$ sudo chown $(id -u):$(id -g) $HOME/.kube/config
In the selected part 2, signifies the “kubeadm join token”. The kubeadm token need to store somewhere in notepad and wherever you want to. After storing, you need to run that specific key token in a node terminal so that it can maintain the communication between the master and node.
You will notice from the previous command, that all the pods are running except one: ‘kube-dns’. For resolving this we will install a pod network. To install the CALICO pod network, run the following command:
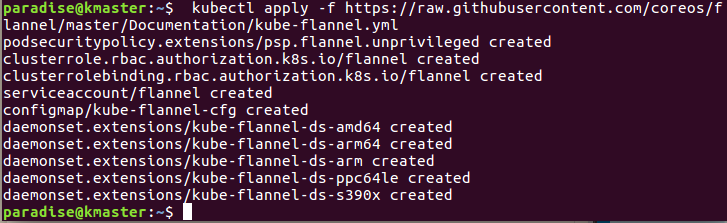
$ kubectl apply -f https://docs.projectcalico.org/v3.0/getting-started/kubernetes/installation/hosted/kubeadm/1.7/calico.yamlInstall network add-on to enable the communication between the pods only on master nodes. Flannel is a network fabric for the containers, that are designed for the Kubernetes.
$ kubectl apply -f https://raw.githubusercontent.com/coreos/flannel/master/Documentation/kube-flannel.yml
To verify, if kubectl is working or not, run the following command.s
$ kubectl get pods -o wide --all-namespaces
use "kubectl get nodes" command to ensure the Kubernetes master node status is ready.
$ kubectl get nodes
4.2 To reset Kubernetes
Now, if you are done with the process of initiating the command and requiring a fresh start, then you can make changes by just following the below command.
$ kubeadm reset
5. Steps For Only Kubernetes Node VM (knode)
For trial purposes, we can create nodes in the same system with the help of a virtual machine.
Prerequisites
1.3GHz or faster 64-bit processor
2 GB RAM minimum/ 4GB RAM or more recommended
install VMware workstation player on ubuntu
5.1 Install required packages
$ sudo apt update
$ sudo apt install build-essential</strong>
$ sudo apt install linux-headers-$(uname -r)
5.2 Download VMware workstation player
$ wget https://www.vmware.com/go/getplayer-linuxOnce the download is completed make the installation file executable using the following command:
$ chmod +x getplayer-linux5.3 install VMware workstation player
Start the installation wizard by typing:
$ sudo ./getplayer-linux1. Just accept the terms and conditions in the license agreement and click on the Next button.
2. Next, you will be asked whether you like to check for product updates on startup. Make your selection and click on the Next button.
3. VMware’s Customer Experience Improvement Program (“CEIP”) helps VMware to improve their products and services by sending anonymous system data and usage information to VMware. If you prefer not to participate in the program select No and click on the Next button
4. In the next step, if you don’t have a license key, vacate the field empty and click on the Next button.
5. Next, you will see the following page informing you that the VMware Workstation Player is ready to be installed. Click on the Install button.
6. Start VMware Workstation Player
Create a new virtual machine

Open a terminal in the virtual system and follow the step to create a user (knode) and enter the command to make a connection between master and node.
$ sudo suNow we are in the ‘knode terminal’ and we need to run kubeadm init. token key in this terminal as we have described above to save the specific key so that it makes a connection between master( kmaster) and node(knode).
# kubeadm join 192.168.1.206:6443 --token 02p54b.p8oe045cpj3zmz2b --discovery-token-ca-cert-hash sha256:50ba20a59c9f8bc0559d4635f1ac6bb480230e173a0c08b338372d8b81fcd061 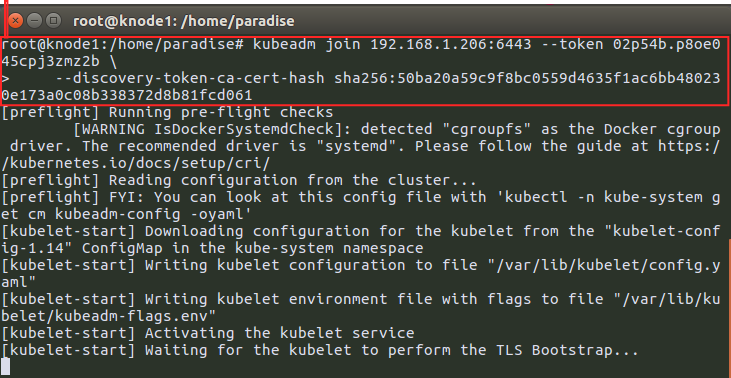
once worker node is joined with Kubernetes master, then verify the list of nodes within the Kubernetes cluster.
$ kubectl get nodes
we have successfully configured the Kubernetes cluster.
Kubernetes master and worker node are ready to deploy the application.
Bottom Line
Now that we have explained about Kubernetes setup, and further, we will move onto something more technical with the other parts of this Kubernetes series. Our next tutorial would explain to you how to make a connection with the dashboard. Till then enjoy learning and try something new.

Comments
Post a Comment